Showing posts with label green. Show all posts

Thursday, November 24, 2011

Ta-Daaaaa!!! Crafter's block solved!

So right after I posted my last entry, the ideas started flooding in.  I had the faux stitched cacus and beanie, and I knew I wanted to use that some how. 


The purple paper is from Recollections Snowy Days paper pad

White rectangle cut using Spellbinders Nestabilities Wonky Recangles and embossed with D'vine Swirl and inked with ColorBox chalk ink

Cactus cut at 4" from Destinations cart

Beanie cut at 1" from Gingerbread cart

Merry Christmas stamp from Fiskars Holiday Hooplah and embossed with Stamp Stuff Winter Wonderland embossing powder

Red 3/8" ribbon from my stash

Card, cactus, and beanie faux stitched with white gel pen

And my favorite part...  Penguins jumping rope using Christmas lights stamp on the inside!


I hope you all have a wonderful Thanksgiving!!


Saturday, August 20, 2011

Graduations!

Grades submitted, transcripts sent, degree conferred, and yup, you guessed it, got my diploma in the mail!!  It took me a while, and there were lots of hurdles, long nights, and cram sessions, but I am officially a college graduate, with my degree in a fancy little frame.  So, in the spirit of celebrating me  gradutating, here's some graduation cards I've made for others. 


Saturday, August 13, 2011

Late to the party: Father's Day

I was really excited when I got my Wrap It Up cart just before Father's day, because it had a tie in it and other random holiday designs.  When I was looking at all the designs included on the cart, I saw the tie, and I knew I had the perfect paper for it. 

My dad was very "suit and tie" for work when I was little, so I knew I just had to make him a special Father's Day card.  I put the tie and the frame on pop dots, and it made the tie stand out exactly like how I had pictured it.  "thanks DAD" stamp was one of those $1 sets from Michael's.


Even though this is one of my favortie designs so far, one of the biggest reasons this is at the top of my favorites lists is because I got to fill the whole inside telling my dad how much I appreciate him and how important he is in my life.  It seems silly to wait for only a few times per year to tell some one how much you love them and appreciate everything they mean to you. 

I hope that we all can start affirming and encouraging those around us all the time, and not save our affections for only certain moments.  I hope you all have having a good weekend so far!

Tuesday, August 9, 2011

Why ello kitty

Hubster and I spent a bit of time away from it all by camping in the mountains.  As I'm sure you all may have seen our little furry-purry Pendleton, we needed a kitty-sitter.  Thankfully, my sisters was super stoked to watch our little Pen-Ben.

And naturally, I was super stoked to make her a thank you card.


Tried to make the white happen with the letterpress, but it just wasn't working out for me.  So I had to try something else to make it work.  I used a cuddlebug folder to emboss the blue paper then used white ink with a stamper pad to color the raised pattern from the embossing. 

I used the Car Decals cart to make the kitty.  "thanks" stamp was from a Fiskars removable stamp pack (can't remember what it's called off the top of my head).  Both ribbons are Celebrate brand.

Hopefully I'll be able to post some more pictures this weekend.  Have lots of cool stuff to show you. 

Tuesday, July 5, 2011

Father's Day

Soooo... not sure what happened to the post I published over the weekend.  I guess I'll jut have to re-type it "/

Happy Belated Fathers Day!!

Better late than never I suppose... But I finally bring you some of the Father's day cards from this year.


I had specific themes for this order of Father's Day cards.  The customer's father is in India, so she wanted something to match the culture.  So lots of vibrant colors and the shinies as I like to call them. 


This was another specific theme request.  The theme was San Francisco, so at first I tried to make something that looked like a trolley, but that definitely did not work.  So a couple weeks after I got this request, my new cartridges came in, so I was super stoked to use my Destinations cart. 

My cricut, however, was not so thrilled.  I think it was throwing a temper tantrum because it was shredding and tearing all the paper I tried to cut for the Golden Gate Bridge.  So I had to get a little creative and make my own "golden" gate bridge.  Took some yellow Bazzill Basics paper and distressed it with Tea Dye and Wild Honey distressing ink. Also did a bit of distressing around the backgroud of the card to get it all to mesh together.

Not too shabby if I do say so my self :]

Well crafters, I'm off to bed, but I just wanted to re-post what didn't want to post over the weekend.  I hope everyone has an enjoyable Hump Day tomorrow!

Until next time happy crafters...


Wednesday, June 1, 2011

First Letterpress/Dye Cut Creation!

So sorry I haven't posted in a while...  all this schooling has kinda been taking up all my time.  And the little time that I do have left over, I've been trying to squeeze in some QT with the Hubster and Pendleton.  There just isn't enough hours in the day...  But I'm sure if there was a way for me to add more to it, even then there wouldn't be enough time to get all the things on my to do list done.

But since I can't change that, on to things worth talking about.  My birthday was a couple of weeks ago, and the Hubster was super duper excited about the birthday present that he got me.  Waaaaaaay back in March, when I came home from the scrapbook convention, I told him I wanted a letterpress/dye cutting machine.  And since he's forgetful, he pretty much ordered one online that day.  So it had just been killing him to wait over 2 months for me to open my present.  But let me tell ya, I am so glad that he did, because I LOVE IT!! 

Thankfully, very soon after I opened my present, I had a card order come in, and I just couldn't make the card fast enough with the dye cutting machine. 


Super stoked to do a bunch of other stuff with this fun new toy.  I actually just got a wedding invite order, so that has been the other thing keeping me super busy...  but I can't show you all yet!!  The bride and I want to keep the invites a secret till they get mailed (since I'm close with the fam, it would totally ruin the surprise if I posted pictures.)  These invites use all my toys right now, I am SO excited.  Little bit of cricut, some cricut design studio, letterpressing, distressing inking, and so much more. 

Stay tuned!!

Saturday, May 7, 2011

Mother's Day Part 2

Hello Crafters!!

Just got done browsing some of the National Scrapbook Day posts, and it definitely looks like a blast!  I unfortunately have too many errands to run today, otherwise I would have definitely jumped right in.  But even though I've been running around like a mad man, I still wanted to bring you part 2 of my Mother's Day cards. 


I love the background pattern on this paper, with the pink and green flowers, but it's hard to incorporate into cards because the pattern is so spread out.  I remembered I had the green background and mini pink flower paper from those spring inspired cards and I knew it would go well with this pattern.


I didn't want the inside to be too busy, so I kept it simple with some gems in the upper left corner.  Since I did a bunch of these cards, the gem colors vary between green, pink, and red. 

I hope you all are enjoying your weekend, and have a fabulous Mother's Day tomorrow!!

Keep on craftin :]

Saturday, April 23, 2011

Spring Cards and Current Distractions

Got some bummer news today, so I'm trying to focus on crafting to keep my mind off of it.  Here is something I've been working on for the past few days.  It's a family (as the Hubster calls it) of 4 spring inspired cards.  They all have the same designs but are slightly different. 


All of the cards are 4 1/4x 5 1/2, two are portrait and the other two are landscape.  The green butterflies are on a background of blended pink ink on top of an orange border.  The butterflies are raised by pop dots to give the card some depth. 

The insert was left blank to allow for occasion customization (Easter/Mother's day/Spring) with the exception of a pink coordinating butterfly.


Got at least one other project to post so far.  And another one waiting in the wings for posting.  It's for a birthday, so the birthday girl gets to see it first before I post it here!!  So check back later in the weekend for what else I have fo you.

Tuesday, April 19, 2011

Happy Anniversary

I am so SO so excited to finally bring you pictures of this card.  This card is what brought my mind back to the creative side!

As previously mentioned, the bestest parents in the world had their 27th wedding anniversary last week.  I went back and forth on the idea and colors of what to do for the card.  Thought about purple since it's one of my mom's fave colors, but then I thought it wasn't just about my mom, it's about my dad too... But I didn't want it to be too masculine either. 

So flipping through all my papers, I came across the green damask ish pattern and it just clicked.


Earlier in the week I actually went lookin around for anniversary stamps since surprisingly, I didn't have any yet.  Everything was birthday or baby inspired.  Luckily, I found something simple and to the point.  I feel like it fit perfect with this card.  You can't really see it but "Happy Anniversary" is embossed in white with silver glitter.

Then came the insert...  I actually cut to size a green distressed pattern for the inside of the card, but when I flipped it over to put stick'ums on it, I discovered I really really liked the pattern on the other side.  And even though it had a lot of blue in it, the pattern still went really well.


I edged the card with a chocolate brown ink to connect it with all the colors on the front.  On the card I sent my parents, the leaf pattern actually kinda framed the top and left side which left a big open space on the bottom right for a message. 

Growing up I didn't understand a lot of the things that my parents said and did.  But now that I am an adult and married, it all makes sense.  My parents have been such an amazing example of sacrificial love with each other and with the rest of the family.  And I am so appreciative of everything they have done for me and that they have made me into the person that I am today.  Love you Mom and Dad!!!!  Happy Anniversary!  Hope you liked your card ;]


Monday, April 18, 2011

Just A Note

Alrighty...  here is one of this weekend's projects.


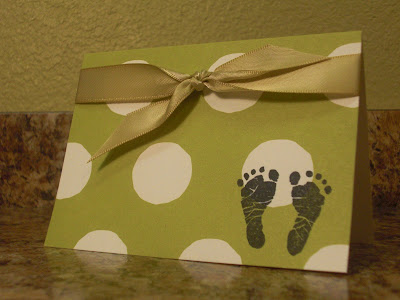
I can't take full credit for this card, I bought the green with white polka dot card from RedStamp.com and then embellished it with beige ribbon and cute lil foot prints.  I wanted something quick and simple, but still personalized.

This was the last thing that I was super slacking on from the baby shower I hosted in March.  I sent all the pictures from the baby shower to the moms of the parents-to-be.  I at first tried to put all pictures on to a disc, but that would have taken 3 or 4 discs there were so many pictures.  So I had to come up with another way to send the pictures out.  I decided on flash drives, and that was so super easy and I don't know why I waited this long to cross this project off my list.

I should be getting my camera back today or tomorrow, so I can take some super sweet pics of the other projects I did this weekend.  But for right now, this is the only pic I have.

Hope you all had a great weekend!

Tuesday, March 15, 2011

Little One

This last weekend, we welcomed little Amelia into the world.  One of my bestest friends of all times had her precious little baby girl this weekend.  I was so excited to see my friend and to finally meet this new little one.  BUT FIRST, I had to make a card to welcome Amelia.


Even though I knew the baby is a girl, I still went with seemingly generic color scheme.  But the reason I chose pink, blue, and green, is because it matches the colors in Amelia's room.  Which is so freakin adorable... might I add.


So after scribbling some notes and sentiments on the inside of the card, I was off to go help Mom by cleaning her house a bit, since Amelia was earlier than expected.  I am so excited about the addition of this precious little one into our lives.  And forsee many many birthday cards on the horrizon...

Sunday, March 6, 2011

Baby Shower, Flowers, and Cards

So much of my time lately has been spent on the planning and preparation of a baby shower for one of my dear friends, Misty.  She and her husband have ASTONISHING will power, and have decided to not find out the gender of their baby until the little precious boopshie arrives and surprises the world.  Thus, the baby shower was of gender neutral colors; it was a little difficult, but yellow and green are some of my fave colors.  You may have seen in previous posts the green and yellow cards and treat bags, so we had to have some coordinating flower centerpieces as well. 


I thought, green, yellow, and white flowers, what a cinch!!  But it was actually kinda difficult to find flowers in my area that looked decent in this season.  Probably had something to do with all the rain we've been having this year.  But thanks to Ralphs and Costco, I was able to put together 3 large and 3 small centerpieces.


I must admit, when I started to assemble the first arrangement, I thought, "What the heck did I get myself into?  There is no way I can pull this off..."  And considering it was the night before the shower, I was startin to get a little worried.  So I told myself, this will work.  This HAS TO work.  And thankfully my head clicked into gear and I whipped these out.

All of the roses opened up by the morning, looking full and gorgeous.  I was so stoked that they filled out.  This was one of my favorite of the smaller centerpieces.

About two weeks ago, the Scrapbook Expo was in my area, so I went with my sister and one of my co-workers (owner of Delo Designs).  We had an uber blasty blast, but were exhausted by the afternoon.  We all came out with amazing things and eager to bust out crafts with our new toys.  I rediscovered some cool techniques I had forgotten about, and found out new about new toys, like a letterpress.  Which will be my next toy...  **wink wink, Hubster**

The Hubster and I also attended a wedding last weekend and I thought it would kinda be against the rules to give a store bought card, considering I'm trying to start my own card business.  So this was another whip something together card. 


You can't really tell, but CONGRATS is embossed in black.  Silver swirls were also embossed

Their red, black, and white wedding was GORGEOUS! And so so so much fun.  It was great to see a lot of the Hubster's friends from the marines again, and nice to finally get to meet some of the wifeys.  There were lots of pictures...  and lots of drunkennes... lol  But all in all, it was a beautiful wedding, and lots of congrats to the new Mr. and Mrs. 

I just had to use some of my new toys from the expo, so I embellished the insert on the card
Without fail, when I walk into a craft store, I find stacks of paper that I feel I just cannot live without.  So my stash of paper is borderline getting out of control.  Before I got to the Scrapbook Expo, I told myself, that I would absolutely not buy any paper, what so ever...  But, as I'm sure you could guess, walked out with almost more paper than I could carry.  Thankfully, just after the expo, I had an order for Thank You cards so buying all that new paper felt justified.


After scouring the interwebz for card ideas and seeing demos of people blending borders on their designs, I just had to try it out on a card of my own.  One of my other co-workers was thinning her crafting collection, and graciously thought of me.  So I decided to give it a whirl.  I think it turned out pretty good.


I spent most of my morning getting my craft cave organized, so I have a renewed passion to get in there and make stuff happen.  Plus... I have orders coming in, so I have to get it crackin.  But I'll leave you with one last picture.  One that was snapped quickly with my phone, but gives me an uber big smile...

Just a little peek into my world of crafting.  I can't wait to make more stuff happen and to share it with you!  Until Next time...